Tuesday, December 10, 2019

Scala Rest API with akka-http

Introduction


In this tutorial we shall explore how we can use akka-http to create service with scala. Here we create CRUD service with akka actor and try to see how it work. 

Versions

Scala version: 2.13.1

SBT version: 1.3.4

Other dependencies - 

About the service/project

We’ll create two actors that communicate with each other to get the user data and user activity data. 

Data Classes

We need two data classes that keeps the user data and user activity data.

Repository

Repositories are used to fetch the data from the actual source of data. The actual source can be anything like another service or some database. We created `UserActivityRepository` that have only one method `queryHistoricalActivities` to fetch the user activity by `userId`.

Actors to get user data 

We need two actor classes for `UserDataActor` and `UserActivityActor`. `UserDataActor` received 4 types of methods `Get`, `Post`,`Put` and `Delete` to retrieve, create, update and delete the user data respectively.  Once a message received, User data will be sent to the sender asynchronously.


`UserActivityActor` retrieve the user active once it receives the message `Get` 

Routing Configuration

Now, we need to create routing details, to access the user details from rest endpoints. We needs following endpoints 


#1
GET /api/users/activity
Retrieve user and its activity details.
#2 
POST /api/user
To create user data
#3
PUT /api/user
To update user data
#4
DELETE /api/user
To delete user data


Routing code looks like below -


We have two `implicit` parameters in the routing config `implicit val userDataActorRef: ActorRef` and `implicit val system: ActorSystem`. `userDataActorRef` is used to get the user data. Since user details is required to register `UserActivityActor` we use actor system and implicit parameter to register `UserActivityActor` when we have user information available.


Web Server
This class is used to create http server and bind the endpoints with the http server. 


Run Application

Compile the code using below command

sbt compile

Run the application

sbt run

Now go to terminal, and run below httpie scripts 

Output of testing endpoints

Github links

Full code is available here to to explore and fork. Feel free to do whatever you want. ;)

Conclusion

We have seen here it’s easy to create rest services with akka and scala. You can get more information at
akka-http official document


Friday, November 30, 2018

Secure spring boot application with keycloak

In last blog post of this series we saw how we can configure keycloak for our application.
Now in this tutorial we
will see how we can use keycloak with spring boot.

Prerequisite
  • Docker
  • Keycloak

Version
  • Spring Boo: 1.5.17.RELEASE
  • Java: 1.8
  • Keycloak: 4.0.5-Final


Create sample spring boot application
Dependencies
  • Spring-boot-starter-web
  • Keycloak-spring-boot-starter

Create rest controller class


Secure App with keycloak
Add maven dependency for keycloak and spring security
  • spring-boot-starter-security
  • keycloak-spring-boot-starter

Configure keycloak server url and realms details in application.properties file


Configure keycloak security settings in the application
Add the blow class to configure the keycloak

KeycloakSecurityConfigurer.class extends KeycloakWebSecurityConfigurerAdapter.class
that
provide convenient base class for creating a WebSecurityConfigurer instance secured by Keycloak.

GrantedAuthoritiesMapper is mapping interface which use to convert case of the role used in the keycloak from
lower case to uppercase.

KeycloakAuthenticationProvider perform authentication process.

NullAuthenticatedSessionStrategy since we are using rest full service so we can provide null authenticated
session strategy.

KeycloakConfigResolver use to tell keycloak to use spring boot configuration.
Instead
use the configuration from the spring boot configuration resolver.

keycloakAuthenticationProcessingFilterRegistrationBean, keycloakPreAuthActionsFilterRegistrationBean are used
avoid re-registration of the filter.

Add security in rest controller SecuredResoureces
Running application

start the application using

mvn spring-boot:run


Call the admin api without security token.


Get access token for admin role


Access admin api with access token


Access user api with access token will give error because user role required for access user service.


Get access token for user role


Access user service


You can get the source code from Bitbucket

Setup keycloak sercurity for spring boot application

Setup Realm and clients in keycloak
This blog is the second part of the series of security spring boot application with keycloak. In first part we install setup in keycloak with docker you can see first part here.
Version:
Keycloak: 4.5.0.Final
Pre-requisites
Keycloak should be installed in the

Create realm
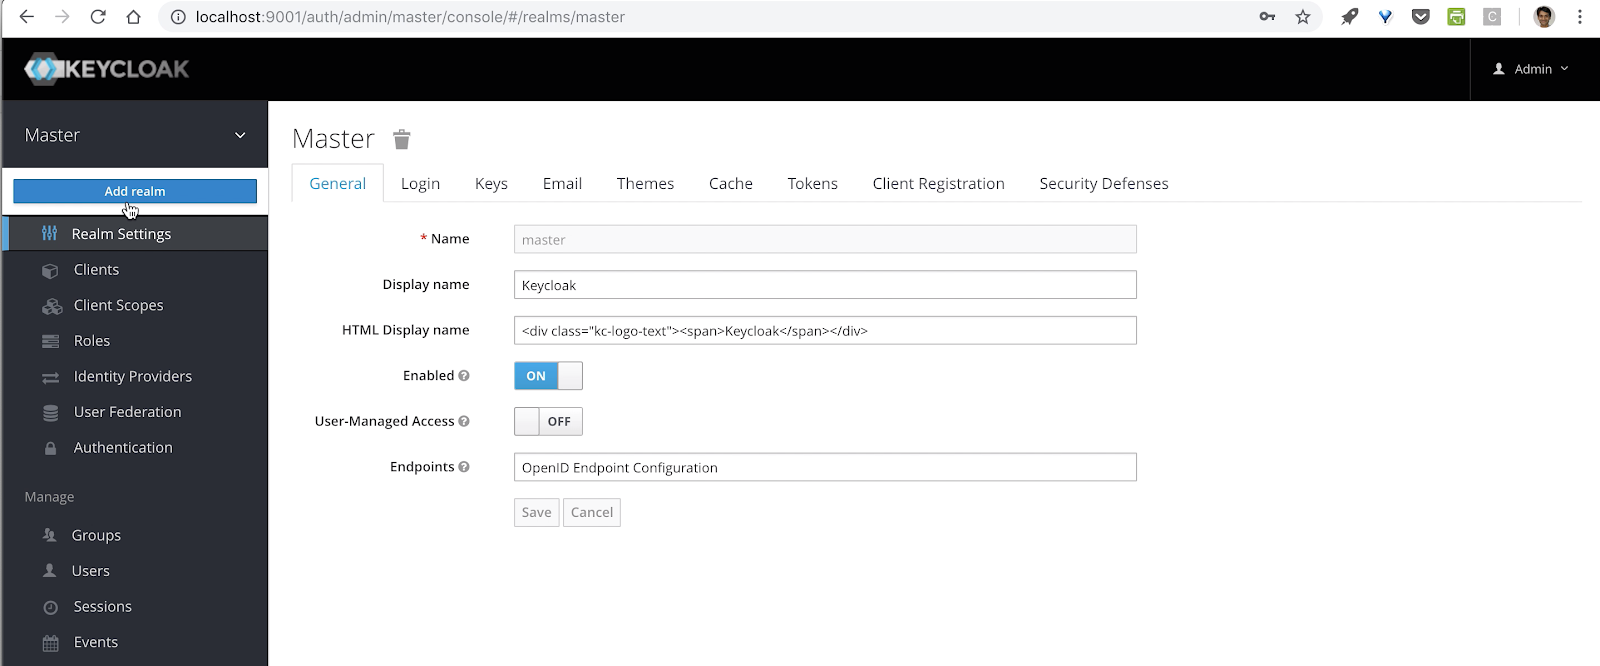
A realm secures and manages security metadata for a set of users, applications, and registered oauth clients. Users can be created within a specific realm within the Administration console.
Click on Add realm button

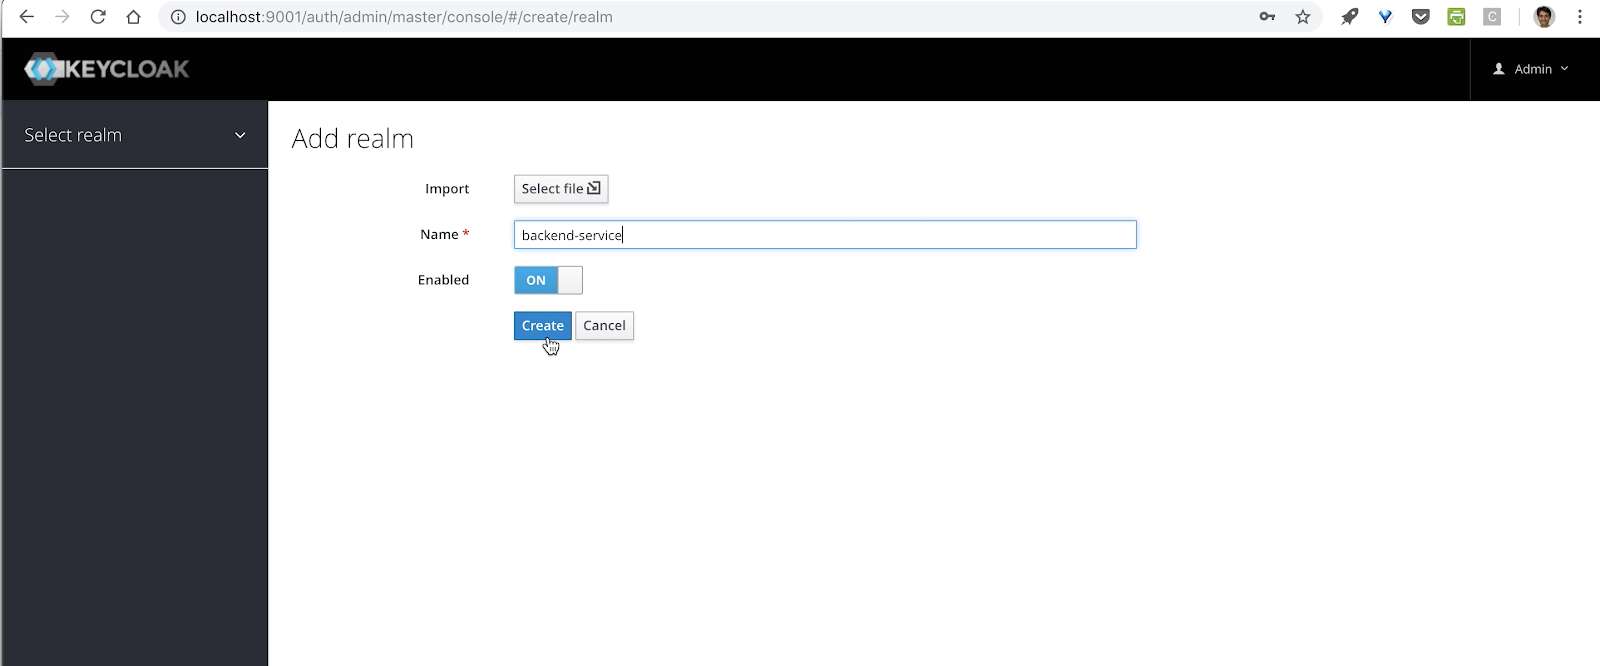
Input the realm name

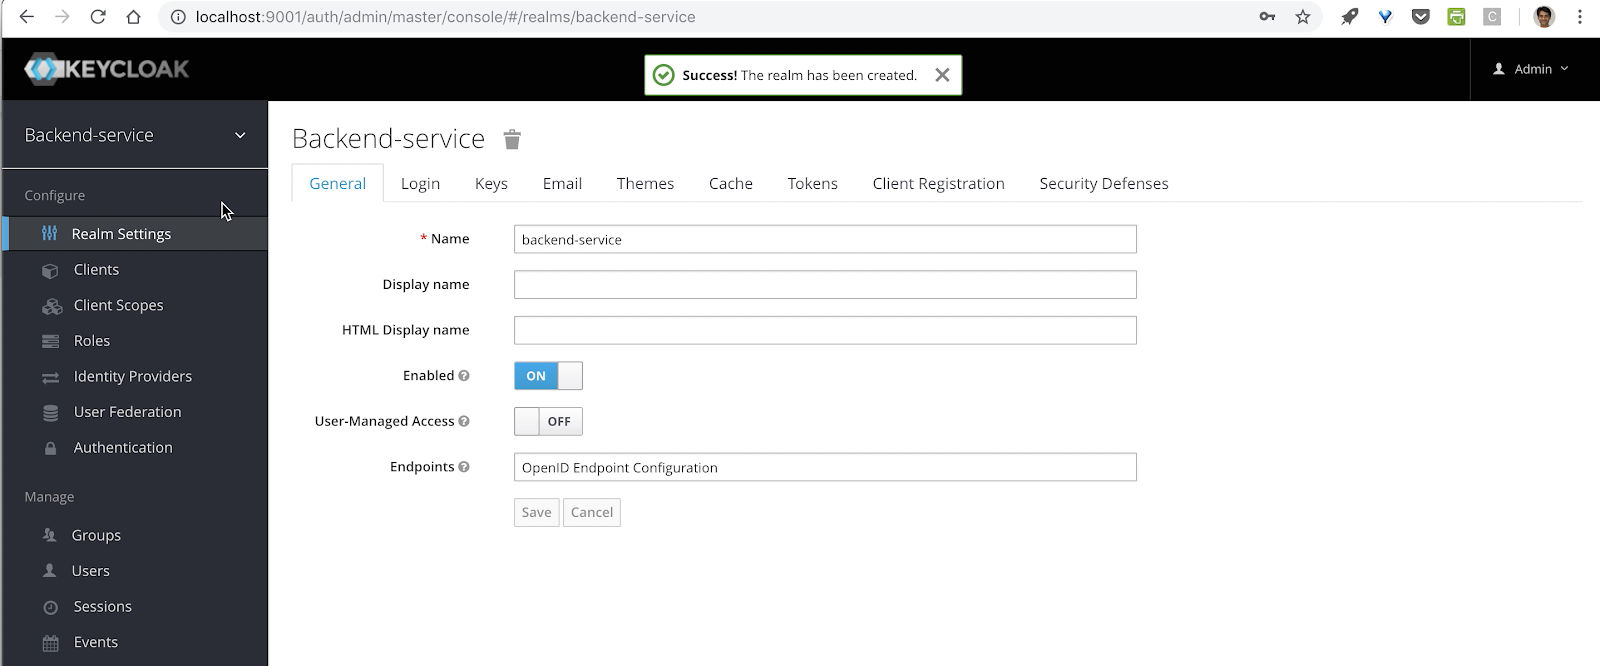
Once realm created you will see this screen


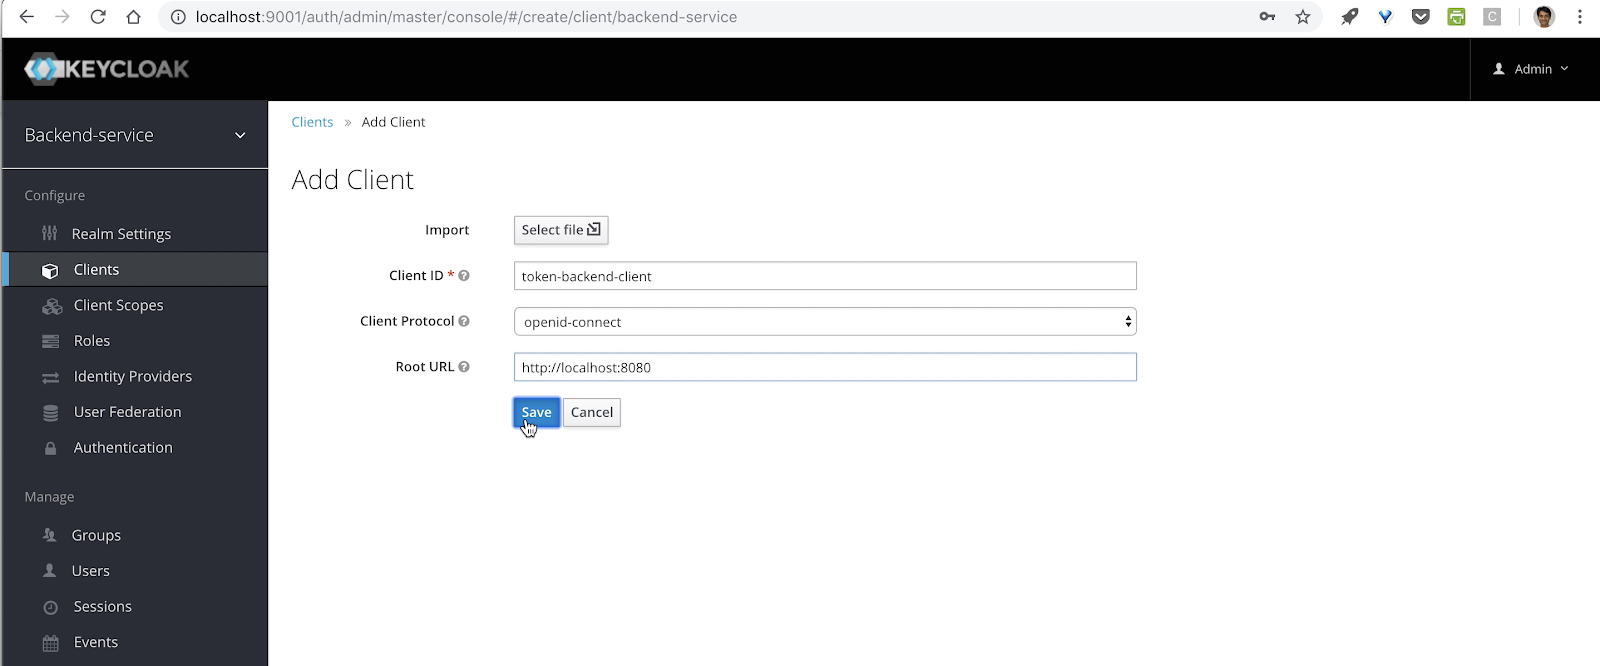
Create Client
We need 2 clients one is for bearer-only client for the application, and another one is public client to get the access token

Create Public client
Once public client is created you will see the below screen


Create Bearer only client and set the access type to beare-only
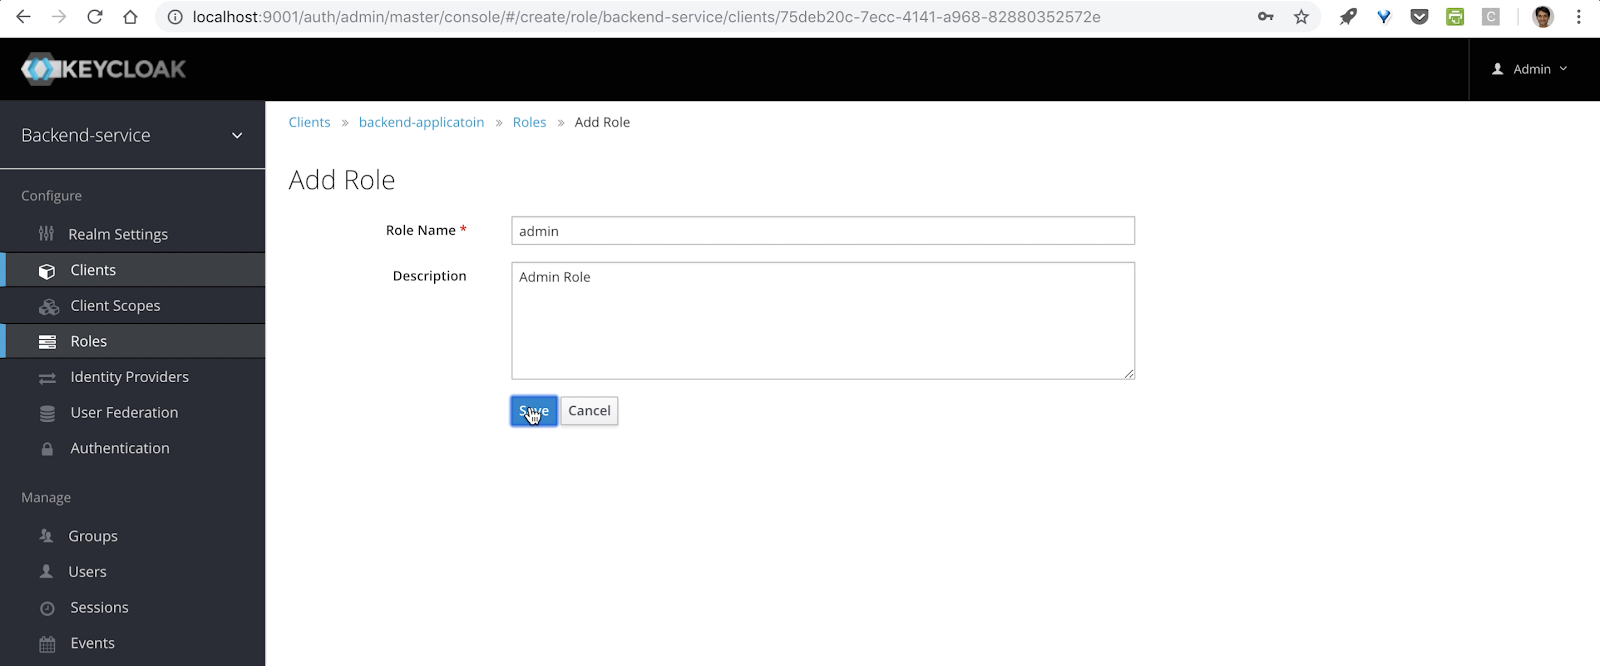
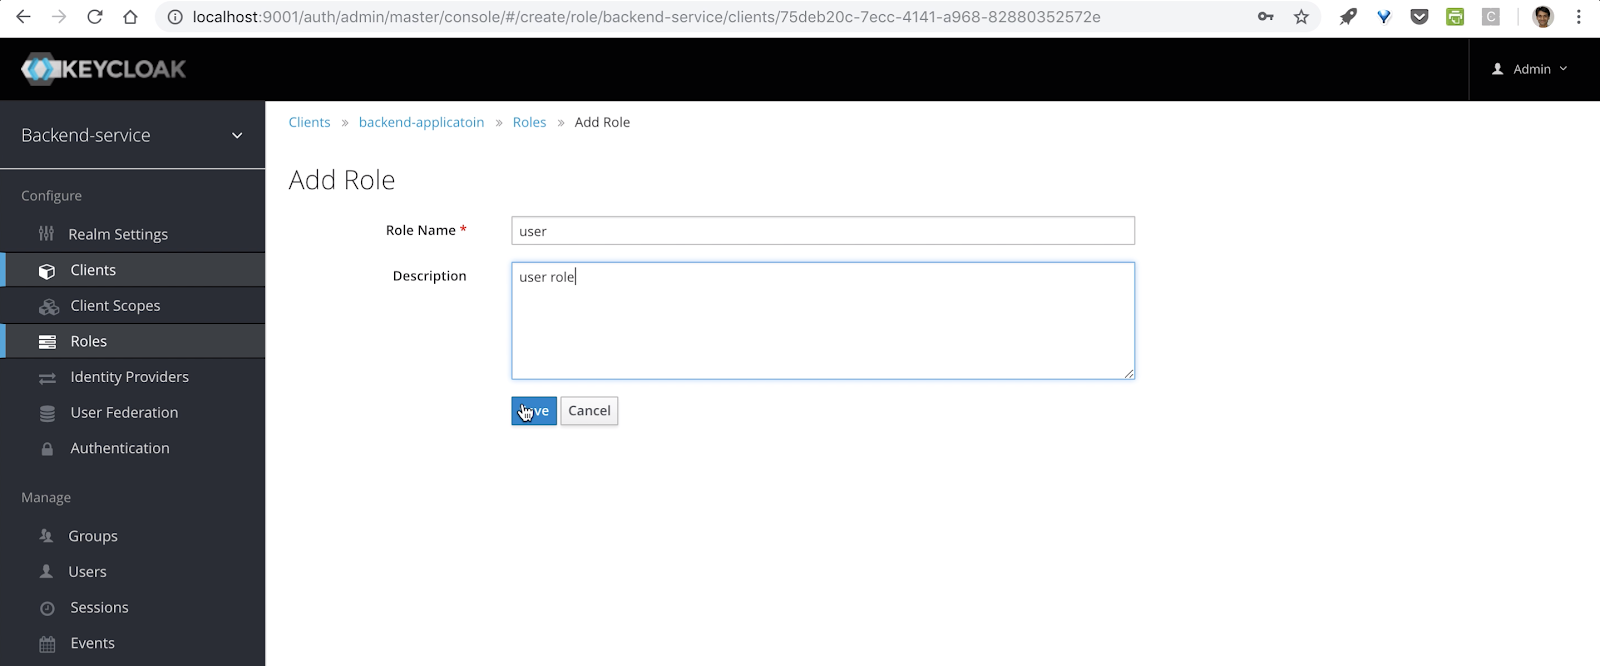
Add new Admin role for the application client

Create Admin Client

 Create User Client
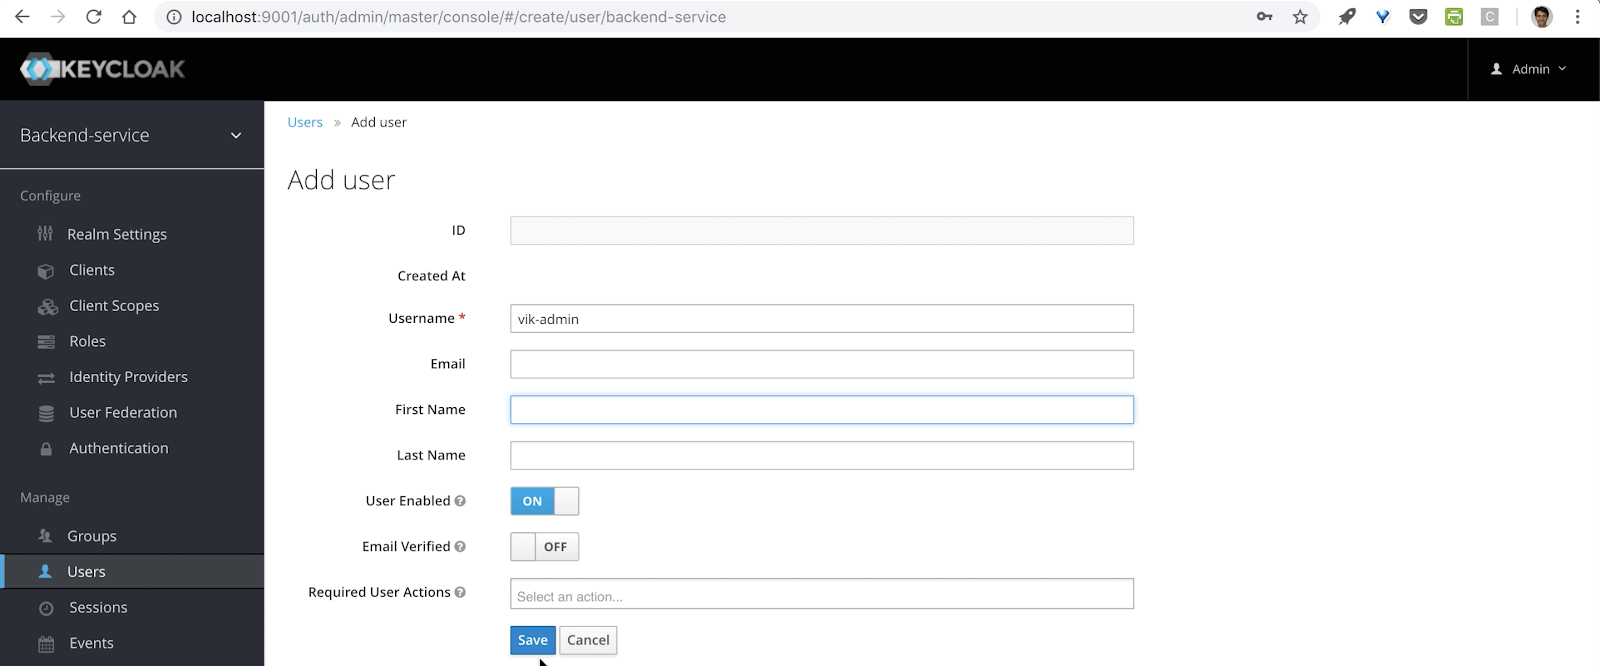
Create User for the application
Create two user with role admin with and user.

 Create admin user

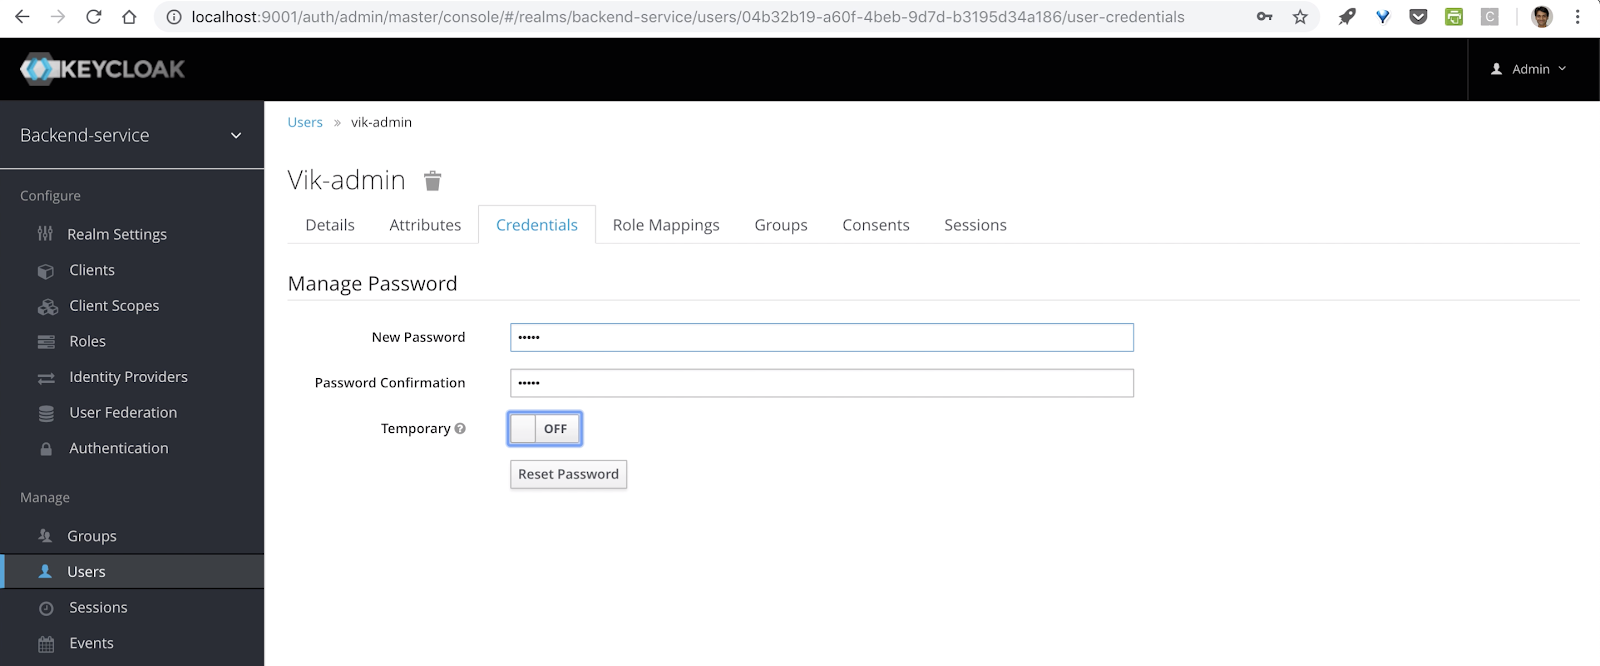
 Set password

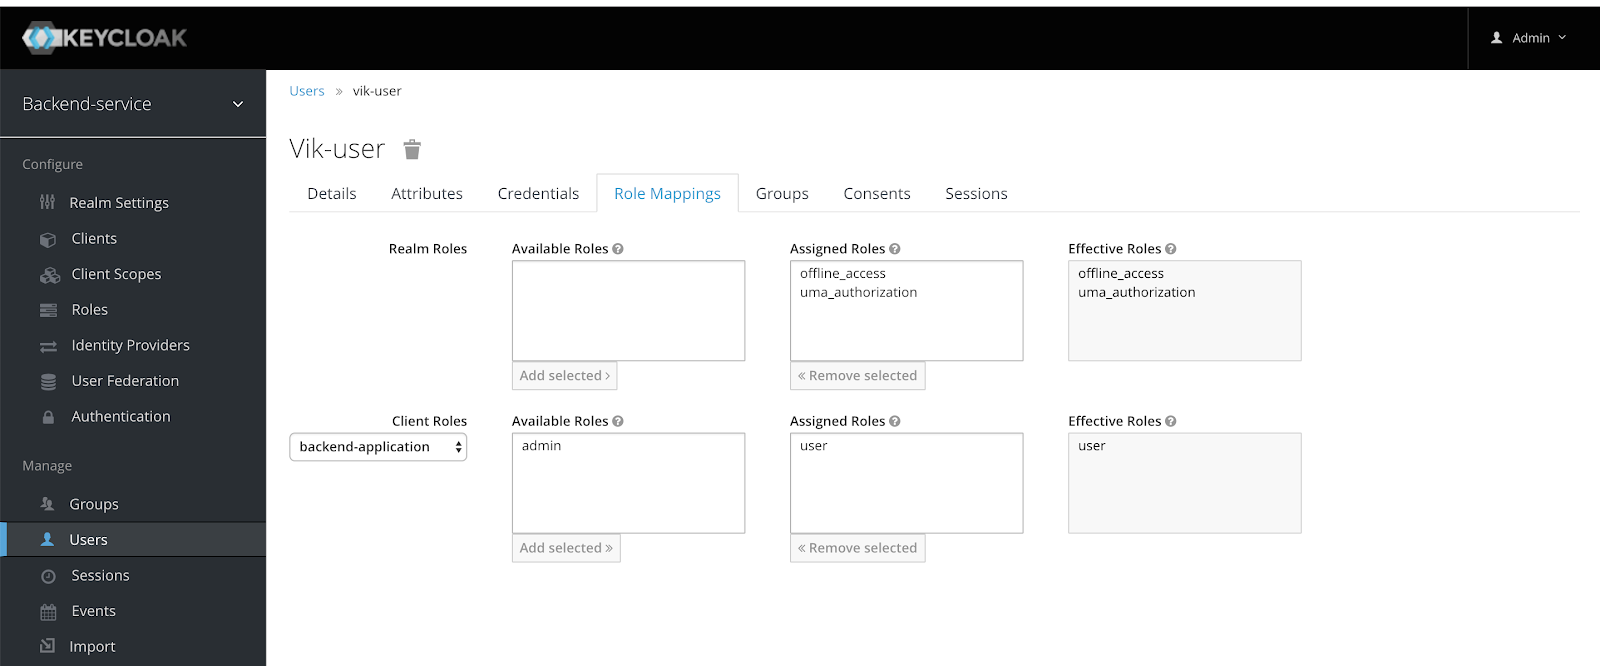
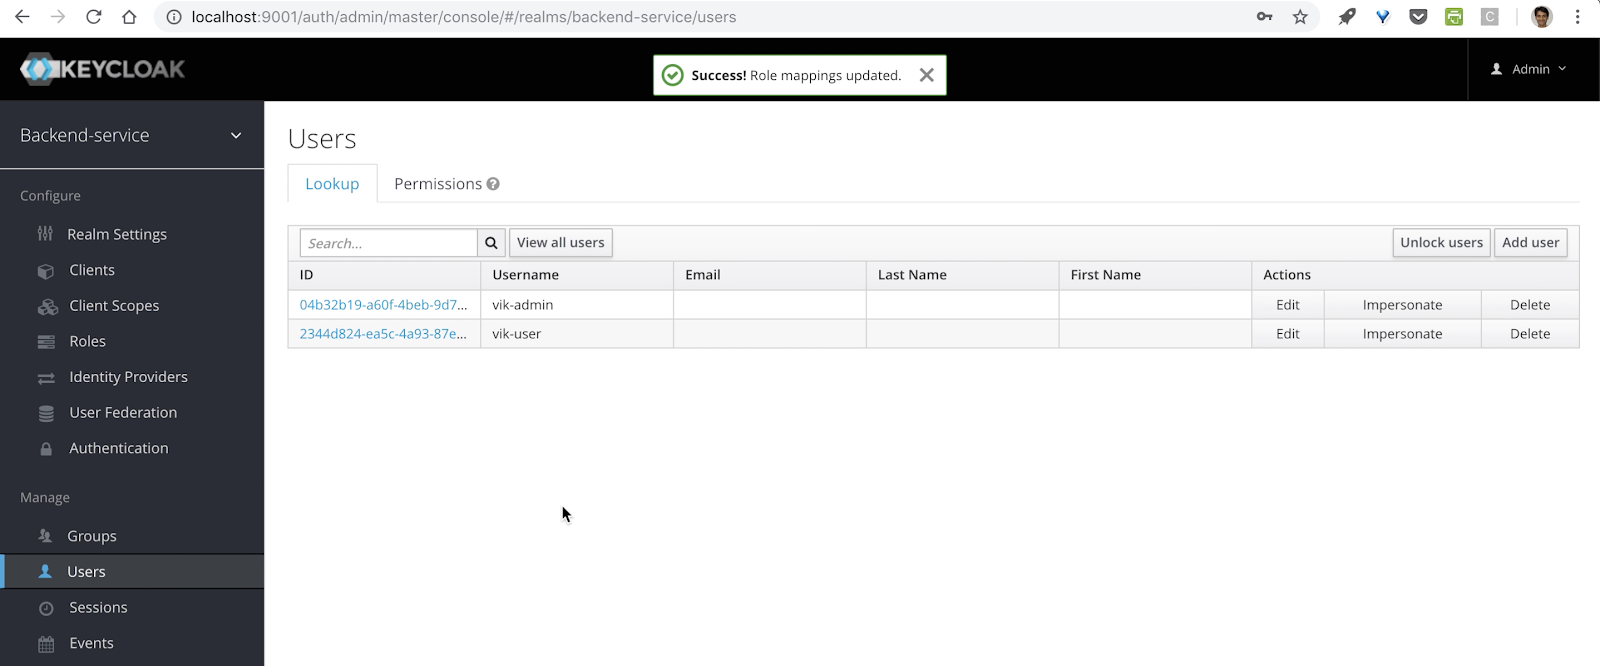
Assign admin role to user vik-admin


Similarly create another user account vik-user with user role


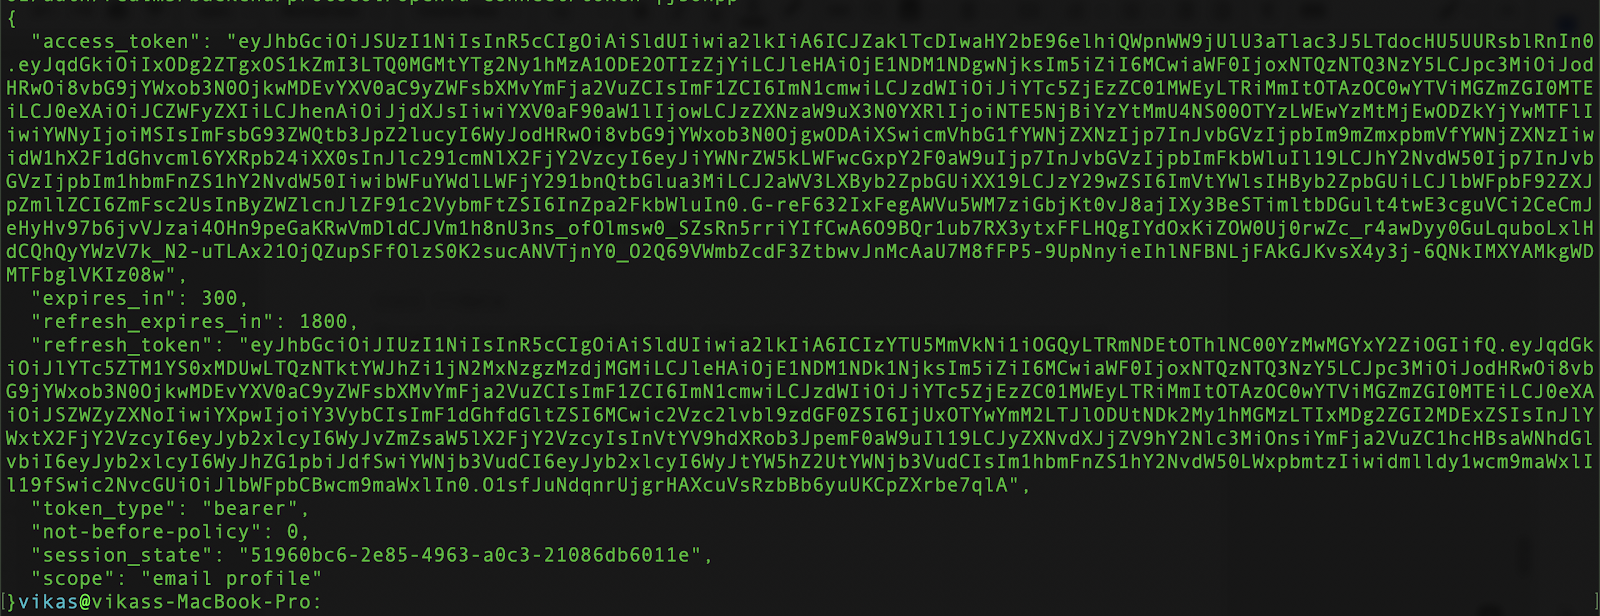
Get access and refresh token
User below curl to get the access token

Response


In the next blog we will se how to secure spring boot application. You can see the blog here.

Wednesday, November 28, 2018

Setup Keycloak with Docker


Introduction of Keycloak
Open Source Identity and Access Management For Modern Applications and Services. It add authentication to applications and secure services with minimum fuss. No need to deal with storing users or authenticating users. It's all available out of the box.

You'll even get advanced features such as User Federation, Identity Brokering and Social Login.
Prerequisites:
Docker:
Since we are using Docker to install Keycloak; it should be installed on your machine. If it is not you can download and install it from the link given below, it’s pretty straight forward.
Create docker compose file
  1. We use keycloak with mysql database to persist the user data.
  2. Use the below docker-compose.yml file to pull and start the docker server

docker-compose.yml


In docker compose file we povide default user name and password for the keycloak use and described in the docker hub for the keycloak image.
  • Our mysql and keycloak server are running on the docker network “Keycloak-network”.
Start keycloak and mysql server
  • Run “docker-compose up” command on the terminal, once the server up you can see the output as below -

  • Go the browser and type the url - http: //localhost:9001 Note: remember we expose the port in the docker-compose file ?

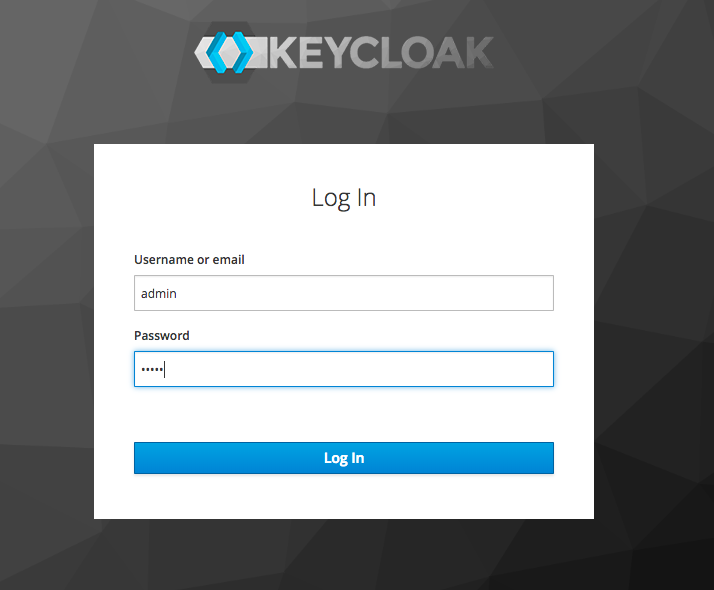
You can now login keycloak from the username and password you provided in docker-compose file. In our case we use username “admin” and password also ‘admin’


After login you will see the default realm ‘master’ as below -

Core concept and terms of keycloak -
Realms:
A realm manages a set of users, credentials, roles, and groups. A user belongs to and logs into a realm. Realms are isolated from one another and can only manage and authenticate the users that they control.

Groups:
Groups manage groups of users. Attributes can be defined for a group. You can map roles to a group as well. Users that become members of a group inherit the attributes and role mappings that group defines.

Clients:
Clients are entities that can request Keycloak to authenticate a user. Most often, clients are applications and services that want to use Keycloak to secure themselves and provide a single sign-on solution. Clients can also be entities that just want to request identity information or an access token so that they can securely invoke other services on the network that are secured by Keycloak.

Client scopes:
When a client is registered, you must define protocol mappers and role scope mappings for that client. It is often useful to store a client scope, to make creating new clients easier by sharing some common settings. This is also useful for requesting some claims or roles to be conditionally based on the value of scope parameter. Keycloak provides the concept of a client scope for this.

Client role:
Clients can define roles that are specific to them. This is basically a role namespace dedicated to the client.

Identity token:
A token that provides identity information about the user. Part of the OpenID Connect specification. You can get more details about this terms here !
Conclusion:
In this blog we learn how to setup keycloak using docker, in next blog we will create an application and secure it using keycloak.

Reference https:

Friday, February 23, 2018

Spring Security with JWT and Oauth2 with Spring Boot

Introduction-

In this article we shall see example of how to secure a spring boot rest application with Spring Boot2, Spring Security, Oauth2, and JWT token.


1. Source Code Repository -

The code used in this article is available in this repository GitHub.


2. Dependencies -


2.1. Versions -

  1. Spring Boot: 2.1.3.RELEASE
  2. Java: 1.8

3. Entity Class -


We create two Entity Classes, one is User and another is Role. User entity class contains user details like name, password, roles details, and role entity contains the role details. One User may have many roles hence we to create many-to-many relationship between User and Role Entity.


3.1. User Entity.java


Entity class that contains the user details.


3.2. Role.java


Entity class that contains the user role data.

4. Create CRUD Repository -


We create spring CRUD repository class, to access user credentials from the database.
Note: we create repository only for User entity class, because in User entity class we specify Many to Many relationship between User and Role entity, and @ManyToMany(fetch = FetchType.EAGER, cascade = CascadeType.ALL) at line number 35 in User.java, will ensure that when new record save in User entity it will also save in Role entity.

4.1. UserRepository.java


5. Create a Spring boot Initialize class


This will boot the spring application.


Now we need to create initial data for users create data.sql file and put it into resource directory.


6. Controller class


Now create controller class to access the resources.


Now our basic application is created, just the start the application server to see the output.

use mvn spring-boot:run to run the application

After the server start just curl the below URL to check if everything is working correct or not

curl http://localhost:8080/app/listAll

Response -

[
  {
    "id": 1,
    "username": "vikas",
    "password": "$2a$04$lZj8KgBFkcPwgRWjH8DwBeCIR7HE6AsIZqTXu2VyeEw5sYLySNAGe",
    "firstName": "vikas",
    "lastName": "verma",
    "roles": [
      {
        "id": 1,
        "roleName": "ADMIN",
        "description": "admin role"
      }
    ]
  },
  {
    "id": 2,
    "username": "james",
    "password": "$2a$04$P2GbxPDh1MYNYyNn/bj.4.QxwDC2jze0xPQF4u6/cNpdkrPq3OdPy",
    "firstName": "james",
    "lastName": "james",
    "roles": [
      {
        "id": 1,
        "roleName": "ADMIN",
        "description": "admin role"
      },
      {
        "id": 2,
        "roleName": "USER",
        "description": "user role"
      }
    ]
  }

]

7. Authentication and Authorization


Now since our basic application is working, it’s time to add authentication and authorization to our application.
Add Dependencies for the Oauth2 Security


7.1. Set the properties related to security


The detail of the properties is as below -
1. security.encoding-strength=256 size of the encoding.
2. security.signing-key is the sign key used to encode the token.
3. security.security-realm realm of the authentication. see
4. security.jwt.client-id=client Client Id.
5. security.jwt.client-secret= It should be BCrypt format you can use this tool to encode any string to BCrypt
6. security.jwt.grant-type=password Grant type, it can be "password", "refresh-token".
7. security.jwt.scope-read=read read scope.
8. security.jwt.scope-write=write write scope.
9. security.jwt.resource-ids=testresource resource id.


7.3. JWTConfigProperties.java


Create a class to access the properties set in application property file.


7.4. UserDetailServiceImpl.java


To access the user credentials from database, we need to implement interface UserDetailsService. It is used throughout the framework as a user DAO. The interface requires only one read-only method, which simplifies support for new data-access strategies.


7.5. WebSecurityConfig.java


Configure the web security by extending the WebSecurityConfigurerAdapter class. It provides a convenient base class for creating a WebSecurityConfigurer instance. The implementation allows customization by overriding methods.

Step#1 Configure UserDetailsService to AuthenticationManager class, and add a password encoder.
*Autowire the userDetailsService instance.

Step#2 Now create AuthenticationManager bean

Since we are using password as grant-type we need to provide the AuthenticationManager implementation.

Step#3 Configure the JWT Token related beans -
tokenStore() Create a new JwtTokenStore with this token enhancer(accessTokenConverter).

accessTokenConverter() Configure JWT signing key. It can be either a simple MAC key or an RSA key. . RSA keys should be in OpenSSH format, as produced by ssh-keygen.

tokenServices() it is default implimentation of the tokenServices, it used to configure the resource related properties. In the tokenServices we used the default implementation of the TokeService interface, and set persistence strategy for token storage. the tokenStore, and configure to support the refresh token.

Now enable Web Security in the application, and Global Method security-

@EnableWebSecurity : It allow the Spring Security configuration defined in any WebSecurityConfigurer or more likely by extending the WebSecurityConfigurerAdapter base class and overriding individual methods.

@EnableGlobalMethodSecurity(prePostEnabled = true) : Enables Spring Security global method security.

@Order : Define the order the security filter chain. The priority of the WebSecurityConfigurerAdapter is more than the resourceServerConfigurationAdapter, hence we re-define the order WebSecurityConfigurerAdapter


8. Define Authentication Manager


Create a class AuthenticationServerConfig.java that extends  AuthorizationServerConfigurerAdapter.java to provides the default implementation for the AuthorizationServer. It is used to register the clients that can access the resource of the application, and also endpoints of the authorization server.


8.1. Configure Clients of the application


the code is self-explanatory, we jest configure the client details that are stored in memory. All the clients’ details are store in the application.property file.
*Autowire the jwtConfigProperties instance.


8.2. Configure the Authorization endpoints


*Autowire the jwtConfigProperties, jwtAccessTokenConverter, tokenStore and authenticationManager instance.
Configure the tokenstore, and tokenEnhancer with the AuthorizationServerEndpointsConfigurer
Configure the TokenStore, authenticationManager, and tokenEnhancerChain in the AuthorizationServerEndpointsConfigurer class.


8.3. Enable Authorization Server in the current application context


9. Resource Server Configuration


Create a class ResourceServerConfig.java that extends ResourceServerConfigurerAdapter.java
This class is used to configure the resourceIds, and the http request URLs that are allowed to access the application, and the URLs that need to be authenticated.


9.1. Configure Resource Id


*Autowire the jwtConfigProperties, defaultTokenService bean instances.
Resource id is configured in application.property file. defaultTokenService is created in class WebSecurityConfig.


9.2. Configure HttpSecurity


This configuration says, authenticate all request that contains "/app/**" in there URL.

9.3. Enable the resource server configuration


10. Modify the controller class


Finally set the roles that can access the application using @PostAuthorize annotation


11. Run The application


11.1 Run MySQL Database

Run below command to run the mysql db in docker

 docker-compose -f docker/docker-compose up


Now all the configurations are done, now we can run the application using below maven command in terminal

 mvn spring-boot:run


11.1 Access Resource with User credentials


After server started, We can get the access token. Run below command to get the access token-


11.1.1. Get Access Token


Result-

{
  "access_token": "eyJhbGciOiJIUzI1NiIsInR5cCI6IkpXVCJ9.eyJhdWQiOlsicmVzb3VyY2UiXSwidXNlcl9uYW1lIjoidmlrYXMiLCJzY29wZSI6WyJyZWFkIiwid3JpdGUiXSwiZXhwIjoxNTUyMDA5ODM2LCJhdXRob3JpdGllcyI6WyJBRE1JTiJdLCJqdGkiOiI3YWJkOThhNC1hNjM4LTRmYmQtOWYzMC0zZWJiNDQ0M2FhMTciLCJjbGllbnRfaWQiOiJjbGllbnQifQ.P0UgLpAuswCs8iHsxT4q23TI1infsIMqZ1YtMlbfWe8",
  "token_type": "bearer",
  "expires_in": 43199,
  "scope": "read write",
  "jti": "7abd98a4-a638-4fbd-9f30-3ebb4443aa17"

}

11.2 Access Resource


11.2.1. Get the access token


** "Y2xpZW50OnNlY3JldA==" is Base64 encoded client-id:secret. you can encode and decode in base64 format using this site. The format of client-id and client-secret should be 'client-id:secret'.

Result-

{
  "access_token": "eyJhbGciOiJIUzI1NiIsInR5cCI6IkpXVCJ9.eyJhdWQiOlsicmVzb3VyY2UiXSwidXNlcl9uYW1lIjoidmlrYXMiLCJzY29wZSI6WyJyZWFkIiwid3JpdGUiXSwiZXhwIjoxNTUyMDA5ODM2LCJhdXRob3JpdGllcyI6WyJBRE1JTiJdLCJqdGkiOiI3YWJkOThhNC1hNjM4LTRmYmQtOWYzMC0zZWJiNDQ0M2FhMTciLCJjbGllbnRfaWQiOiJjbGllbnQifQ.P0UgLpAuswCs8iHsxT4q23TI1infsIMqZ1YtMlbfWe8",
  "token_type": "bearer",
  "expires_in": 43199,
  "scope": "read write",
  "jti": "7abd98a4-a638-4fbd-9f30-3ebb4443aa17"

}


11.2.2. Access Admin Resources


To access the resource that required admin privilege you need to get the access token with user james/james, because this user have admin privilege


Result-

Access admin resources -
Hello Admin!!!
Access user resources -

Hello User!!!


11.2.3. Access the User resources


Result-
Hello User!!!

That's all for the Authentication and Authorization with Oauth2. You can access the resource from GitHub.

Tuesday, April 25, 2017

JPA EntityListner example with Spring Boot 1.5.1

To audit any transaction table you can use EntityListener Annotation of the JPA. JPA provide the EntityListener annotations that attach a listener class with the entity that you want to audit. 

What is audit table ? 

Audit Tables are used to track transactions against a particular table or tables. They allow you to see an ongoing "log" for future use.  

There may be users and/or applications that have access to insert, update, and delete out of that table. If you may want to have a quick and easy way to track who is doing what on that table. 

Scope -  
We will create a trigger like functionality. We shall audit all the DML operations (i.e. Insert, update and delete) on a table. We shall log all details of the operation, time-stamp, and the user name details in the audit log table. 

Dependencies -  

Create Application -

First create User Entity class that contain the user details data.

User.java

Create Spring data repository to create CRUD operations on the database.

UserRepository.java

Create a Controller class to handle the Request -

UserController.java

Create Application class for spring boot configuration.

Application.java


Project Structure -


Compile the application with below maven command -

mvn clean install  

Run the example by below command on the command line  - 

mvn spring-boot:run 

You can now perform create and update operation on the user entity.

Create AuditLog Entity and AuditLogRepository class -

Create a AuditLog entity for audit log table, to keep the audit data -

AuditLog.java


Create a Spring repository for CRUD operation on the on database.


AuditLogRepository.java

Attach AuditLog entity with User Entity class -

First create a Entity Listener class that will listen the User table, and if any update operation performed on the User entity, the listener will call the call back methods.

UserAuditLogListener.java

The same callback method or entity listener method can be annotated with more than one callback annotation. For a given entity, you cannot have two methods being annotated by the same callback annotation whether it is a callback method or an entity listener method. A callback method is a no-arg method with no return type and any arbitrary name. An entity listener has the signature void <METHOD>(Object) where Object is of the actual entity type (note that Hibernate Entity Manager relaxed this constraint and allows Object of java.lang.Object type (allowing sharing of listeners across several entities.) 

A callback method can raise a RuntimeException. The current transaction, if any, must be rolled back.

The following callbacks can be used -

Type
Description
@PrePersist 
Executed before the entity manager persist operation is actually executed or cascaded. This call is synchronous with the persist operation. 
@PreRemove 
Executed before the entity manager remove operation is actually executed or cascaded. This call is synchronous with the remove operation. 
@PostPersist 
Executed after the entity manager persist operation is actually executed or cascaded. This call is invoked after the database INSERT is executed. 
@PostRemove 
Executed after the entity manager remove operation is actually executed or cascaded. This call is synchronous with the remove operation. 
@PreUpdate 
Executed before the database UPDATE operation. 
@PostUpdate 
Executed after the database UPDATE operation. 
@PostLoad 
Executed after an entity has been loaded into the current persistence context or an entity has been refreshed. 

For more information please refer this link.

Thing to keep in mind!!
You can define several entity listeners per entity at different level of the hierarchy. You can also define several callbacks at different level of the hierarchy. But you cannot define two listeners for the same event in the same entity or the same entity listener.

When an event is raised, the listeners are executed in this order: 
@EntityListeners for a given entity or super class in the array order 
Entity listeners for the super classes (highest first) 
Entity Listeners for the entity 
Callbacks of the super classes (highest first) 
Callbacks of the entity

Modify User entity to attach EntityListener class -

User.java

 Annotation @EntityListners specifies the callback listener classes to be used for an entity or mapped super class.  
@EntityListeners (value = UserAuditLogListener.class) will attach the UserAuditLogListener.class with the User Entity class. 

JPA Entitylisteners are not entities, they are simply java classes in which JPA life cycle callback methods are implemented using annotations.

Save data in the AuditLog table-

To inject AuditLogRepository into the UserAuditLogListener we can use an ApplicationContextAware Bean that will give the AuditRepository from Spirng context  to save the Audit data. So, Create a BeanUtility service that implement the application context.

BeanUtility.java
Create a controller class to handle the request for audit log data .

AuditorController.java


Updated Project Structure -


Now build the program using below maven command on the command line  - 

mvn clean install  

Run the example by below command on the command line  - 

mvn spring-boot:run


You can download the sample code from below link - 
Sample Program


Wednesday, April 19, 2017

Spring boot scheduling with annotation

Spring Boot provides annotation support for task scheduling. It is easy way to develop and run a Task scheduler without using any xml and bean configurations.

Simply add the annotation @Scheduled on the task scheduler method with required interval time.

In this example, we will see how to use Spring @Scheduled annotation to schedule a task.

Enable scheduling annotations

To enable support for @Scheduled annotation add @EnableScheduling to one of your @Configuration classes:


You are free to pick and choose the relevant annotations for your application. For example, for more fine-grained control you can additionally implement the SchedulingConfigurer interfaces.

The @Scheduled annotation

The @Scheduled annotation can be added to a method along with trigger metadata. 

Important: The simple rules that need to be followed to annotate a method with @Scheduled are:
  • A method should not accept any parameters
  • A method should have void return type
For example, the following method would be invoked every 5 seconds with a fixed delay, meaning that the period will be measured from the completion time of each preceding invocation.


If a fixed rate execution is desired, simply change the property name specified within the annotation.
The following would be executed every 5 seconds measured between the successive start times of each invocation.


For fixed-delay and fixed-rate tasks, an initial delay may be specified indicating the number of milliseconds to wait before the first execution of the method.


If simple periodic scheduling is not expressive enough, then a cron expression may be provided. For example, the following will only execute on weekdays.

Thank you.